
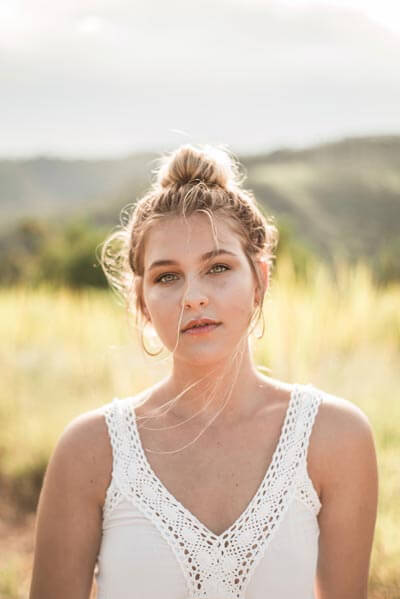
5 Portrait Photography Tips You’ll Never Want To Forget
Portrait Photograph
Portraiture is the ability to capture pictures artistically to represent a person’s attitude, personality, and identity.
A great portrait captures subjects’ essence either through their laughter or their dimples that can are visible after intense focus. New portrait photographers struggle to capture perfect exposures using the camera to satisfy the desired needs of their clients.
The article clearly illustrates five useful tips that should be embraced to upgrade to quality portrait photograph shoots by exploring the best camera settings, eye emphasis, professional posing, lighting the portrait as well as the selection of perfect background. The shooting of stunning pictures using a mirrorless camera or DSLR come up as a result of an effective embracement of the techniques.

Choosing Impeccable Background for your Subject
The impeccable background is an essential component that emphasizes the subject, enlightening the picture as well as when underutilized make the image look chaotic.
The ground of a portrait is equally vital as the subject. A distracting and hectic background takes attention to the variable in the photo. The picture should be uncluttered as well as neutral to minimize cases of the distracting viewer of the photograph in the portrait’s subject.
However, choosing of plain background does not make the picture more attractive but rather the use of the flowers, trees, or houses also portrays a beautiful texture.

Moreover, the addition of an object in the back provides a context and added interest, for instance, capturing a fisher in front of a boat or ship satisfies the identity of the subject.
Before capturing a photo, one should precisely pay attention to the overall scene but not just the subject. Choosing the correct background regarding the person present in the portrait affects the attitude of people towards it.
A new photographer should adopt the abilities to identify client’s needs and to embrace the art of creativity while choosing the correct type of portrait background to use.

Posing Portrait Subject Professionally
Subjects prefer directions rather than standing awkwardly in front of the camera, although some of the new photographers fear the act of posture as they panic to take the obligation of authenticity on the picture.
Posing perfect portrait subject came up as a result of keeping the person ready, relaxed, and comfortable all through the process of shooting. The photographer should work quickly, calmly, and confident while giving instructions as many subjects tend to know how to pose but equally needs constant guidance.
Giving simple adjustments such as, lower your chin a little, smile towards the camera and straighten your back should be embraced rather than giving overwhelming and complicated requests. Some of the perfect posing techniques are, for instance, having your subject sit as this keep them cool hence making them more comfortable and relaxed.

Secondly, having the subject lean slightly towards the camera or have their shoulders and body turned somewhat away from it to make the shoot more engaging and effective.
Also, they should request the clients to be angled away from the camera. Remarkably, a captured portrait should not be cropped either through joints or chin.


Finally, capturing photographs from above displays the waist being slimmer, especially when the subject moves away from the camera.


Advance utilization of hats balloons among other prop instruments portrays pose styles or unique approach towards the photo.

Lighting the Subject
Lighting is a vital requirement in the creation of professional images.
Therefore, it is always necessary to manipulate and control it appropriately to get color vibrancy, luminosity on the client’s portrait as well as favorable texture.
A subject can make a great pose, perfect expression, and utilize the best camera settings, but in the end, the portrait may appear dull due to a lack of understanding of light. Natural daylight is a most striking light source as it adds contrast, interest, and creativity in a portrait, mainly when there is no dedicated studio light.
 Firstly, new photographers should take time to learn different time frames of day that are conducive to take shots, for instance, the golden hour that’s one hour before the sunset which is more favorable for a beginner.
As such, faintly overcast daylight provides a lovely light that flatters on the subject while direct sunlight creates undesirable features such as, a shadow on the subject’s look. Photographers should find an appropriate light shade for their clients when there is unconducive sunlight.
Alternatively, they should embrace the opportunity and shoot carefully on the sun with the subject’s back towards it using the skill of backlighting, which causes a golden glow around the picture.
 Shooting towards the sun requires one to use the “fill” setting to illuminate shadow from the subject’s face.
Fill light can be reflected light bounced back towards the subject’s face using a simple white card sheet or a reflector.
Instead, the photographer should use an external or a camera inbuilt flash or use natural daylight windows where the subject is positioned near the window facing slightly toward the sun. Under this condition, there will be shadows on the parts of the client’s body, which can add depth and the sense of drama in picture.
Occasionally, when the image turns to be dimmer, the photographer should try bouncing some of the window light back into the areas affected using a reflector.

Use of A Suitable Focal Length
Focal length presents a predictable volume of a picture alteration which can brand or break a portrait photograph.
Photographers should examine their lens barrel to check what focal lengths they offer. The focal length is displayed in millimeters such as 55mm,18mm, among others.
Meanwhile, prime lens and fixed lens contains only one focal length. For one to select an appropriate range on a zoom lens, one should rotate the zoom ring on the lens tub whereas cameras that do not have the ring zoom +/- buttons on the body are used.Many portrait shooters regularly ask of the best focal length to use to acquire perfect results whereas there is no bad or best, but a 50mm focal length gives the most accurate depiction of the subject as it does not distort the face.
Use of a lower range causes undesirable alteration of facial characteristics, for instance, the size of the nose or the forehead which appears to be more exaggerated and reduced.

Besides, you’ll need to get closer to the subject to fill the frame which can be too close beyond the subject and photographer’s comfort. Use of over 50mm flatten the facial features of the portraits subject’s which at extreme widen persons face.
In moderation, this acts quite pleasing. Thus, every photographer has a different preference regarding the client’s satisfaction.
Finally, the longer the length used, the further the photographer’s distance towards the subject to fit them in the frame. The interval is more beneficial while targeting a natural or more relaxed shoot from the client, creating a gap in between the subjects. However, it can also disadvantage peoples with small rooms, especially when shooting indoors.

Emphasize the Eyes
A sharp focus on eyes creates an engaging photo and the sense of eye contact in between the subject and the viewer. Portraits photos look lovely when the eyes are in sharp focus. In shallow depth, ground photographers should often set the focus point sensibly to achieve quality results. Cameras has several autofocus points which are always visible in the viewfinder. The portrait photographer should select the central autofocus using the AF option then position the primary points towards the subject’s eyes, followed by a half-press on the shutter button to lock the focus. Favorably, if necessary, the viewer should move the camera to recompose the shot with the best composition before pressing the shutter button to take the photo. Equally, when recomposing the distance between the camera and the subject, it should be constant to maintain the eye focus. Some of the cameras offer the capability to magnify the picture, which makes it invaluable to check AF before the actual shooting.
 As such, to make subjects eyes to pop the viewer should ensure light reflection to the eyes, these reflections are known as “catch the light,” which effectively transform portrait from boring to a unique looking. To achieve maximum effect, the photographer should have one catch light per eye as well as aiming to have them in the top of the eye.
Finally, eye emphasis through direct eye contact, direct contact in between the subjects, and the circumstances that no eye contact is needed photographer should account the need of the client and the impressions given by the image. Identification of this technique can be used to develop a relationship between the subject in the image and the viewer, for instance, the representation of couples by the use of the photographs.
Conclusion
In conclusion, capturing the best portrait photographs requires total embracement of the techniques to develop experiences in the field. Picking of attractive background for subjects creates a sense of creativity and innovativeness, which increase the reputation of the photographer. Also, the selection of extra-large space should be adopted to establish a show depth with a beautiful background. Secondly, taking professional poses for the subjects satisfies their needs as the portrait displays their personality comfortably. New photographers should strive to identify an excellent backdrop and ensure sufficient lighting to illuminate the picture. One should also try to add props and poses for visual interest to make the subject feel comfortable and at ease. Use of an appropriate focal length and ensure and set focus point carefully to prevent distortion of clients features. To attract attention while designing the portrait, the photographer should establish a focal point to emphasize the essential part of the subject. Adjustment of exposure compensation should be made to expose the subject’s face properly. Finally, the entire new photographer can soon create professional-looking photographs if they adopt the discussed techniques.


Mastering Image Resizing: A Step-by-Step Guide on How to Resize an Image

How to Remove the Background from a Picture with inPixio: A Step-by-Step Guide

What are WebP files and how do you convert them?

5 Social Media Photo Tips for Busy Small Business Owners


