Mastering Image Resizing: A Step-by-Step Guide on How to Resize an Image
Images are a powerful tool in the world of content creation, but they don’t always come in the perfect size (or sizes) for your needs. Whether you’re a small business owner, entrepreneur, or content creator, you’ll often find that it is essential to resize your images for different platforms and uses. In this comprehensive guide, we’ll show you how to resize an image easily using inPixio’s web app and share some expert resizing tips to help you create professional visuals for every platform.

Why Resize Your Images?
Before we delve into the step-by-step guide on how to resize an image, it’s important to understand the “why” behind image resizing. Using a free image resizer to get the perfect width and height for your visuals has multiple benefits, here are just a few:
Improved Loading Speed
Optimizing your website’s loading speed is crucial, and oversized images can slow it down. By resizing your images to the appropriate dimensions, you can reduce file size, ensuring faster page load times and a better user experience.
Mobile Responsiveness
In today’s mobile-first world, it’s essential that your images look great on all devices. Resizing images ensures that they adapt well to various screen sizes, making your website or content more mobile-friendly.
Storage Space
If you’re managing a website or dealing with large batches of content, using an image resizer can help you save valuable storage space without compromising on quality.
Consistency
Consistency in image dimensions is vital for branding. When you resize photos to the same width and height, it helps ensure a uniform look across your website or social media profiles.
Platform Requirements
Different online platforms have specific image size requirements. Resizing your images according to these requirements ensures they display correctly without cropping or distortion. This helps you to convey a professional and polished appearance on social media, blogs, and websites.
Now that we’ve covered some of the main benefits of using an image resizer to get the ideal dimensions for your images, let’s dive into the step-by-step guide on how to resize an image using inPixio’s web app.
How to Resize an Image: Step-by-Step Guide
InPixio’s web app contains a handy image resizer tools that you can use to easily resize images for websites and social media platforms. Follow these steps to resize pictures in no time:
Step 1: Access the inPixio Web App
Visit the inPixio web app. Log into your account if you already have one.
Step 2: Upload Your Image
Click the “Upload” button and select the image you want to resize from your computer.
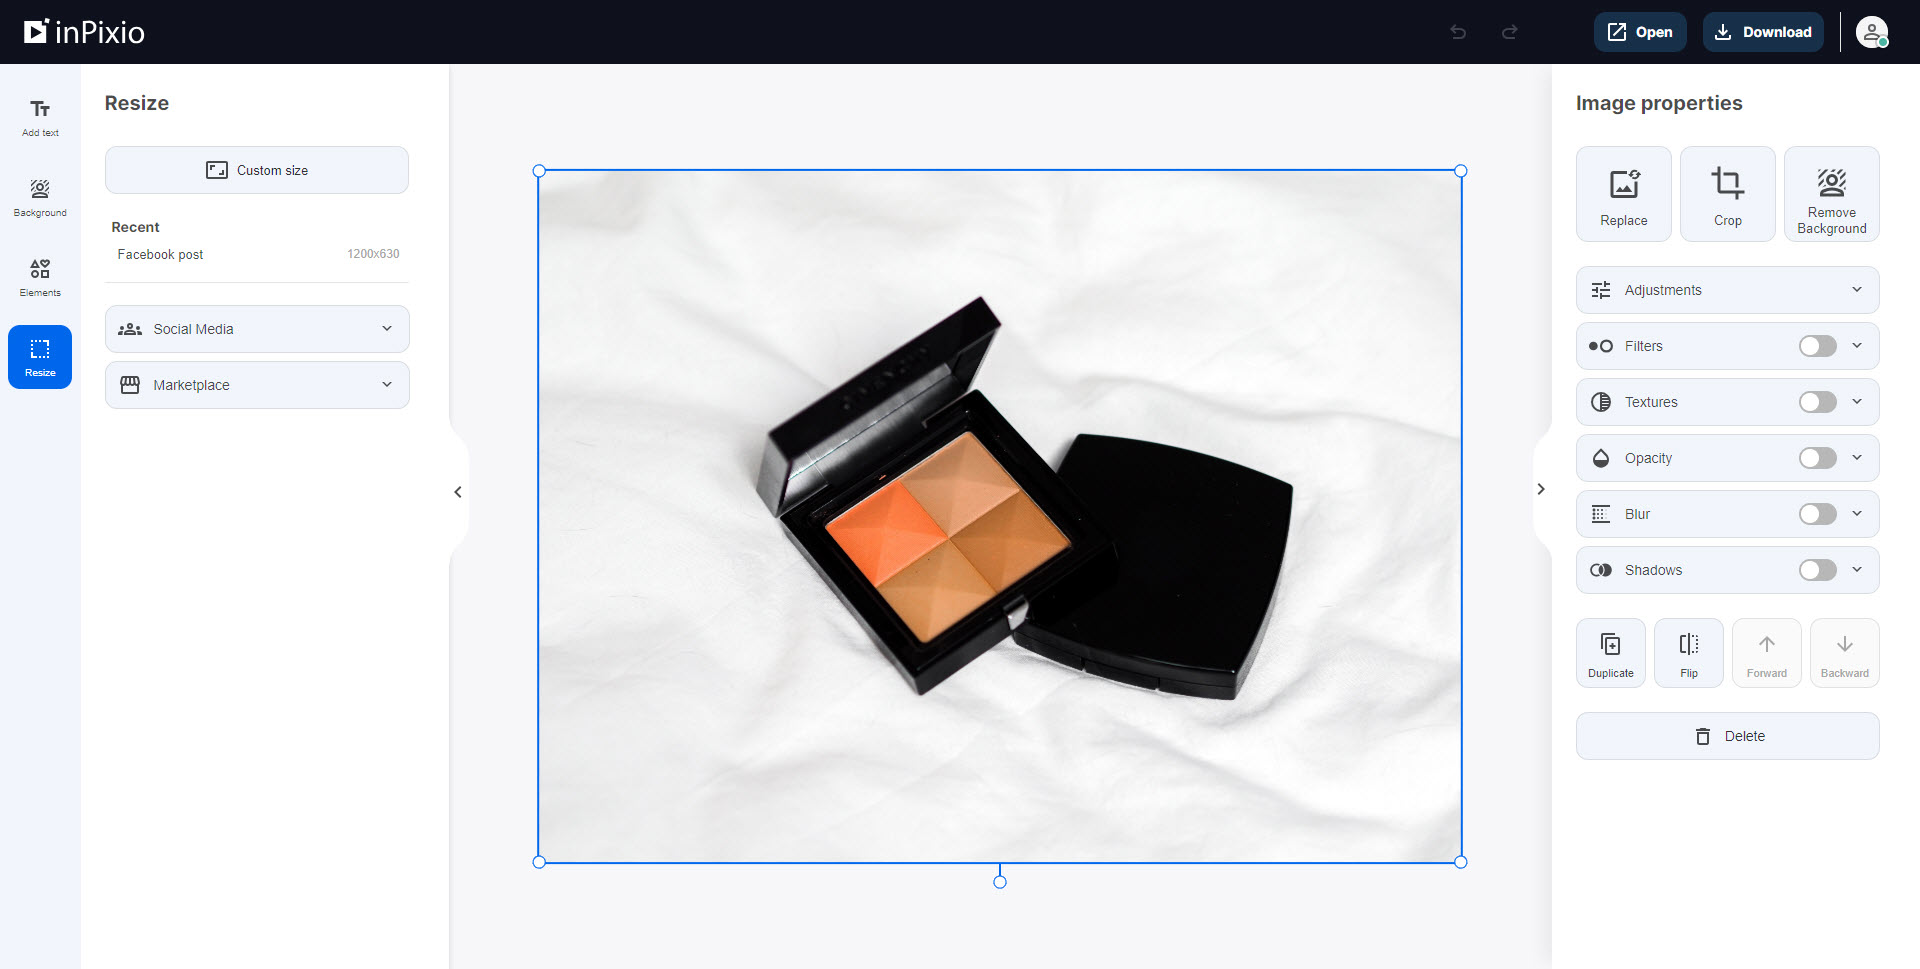
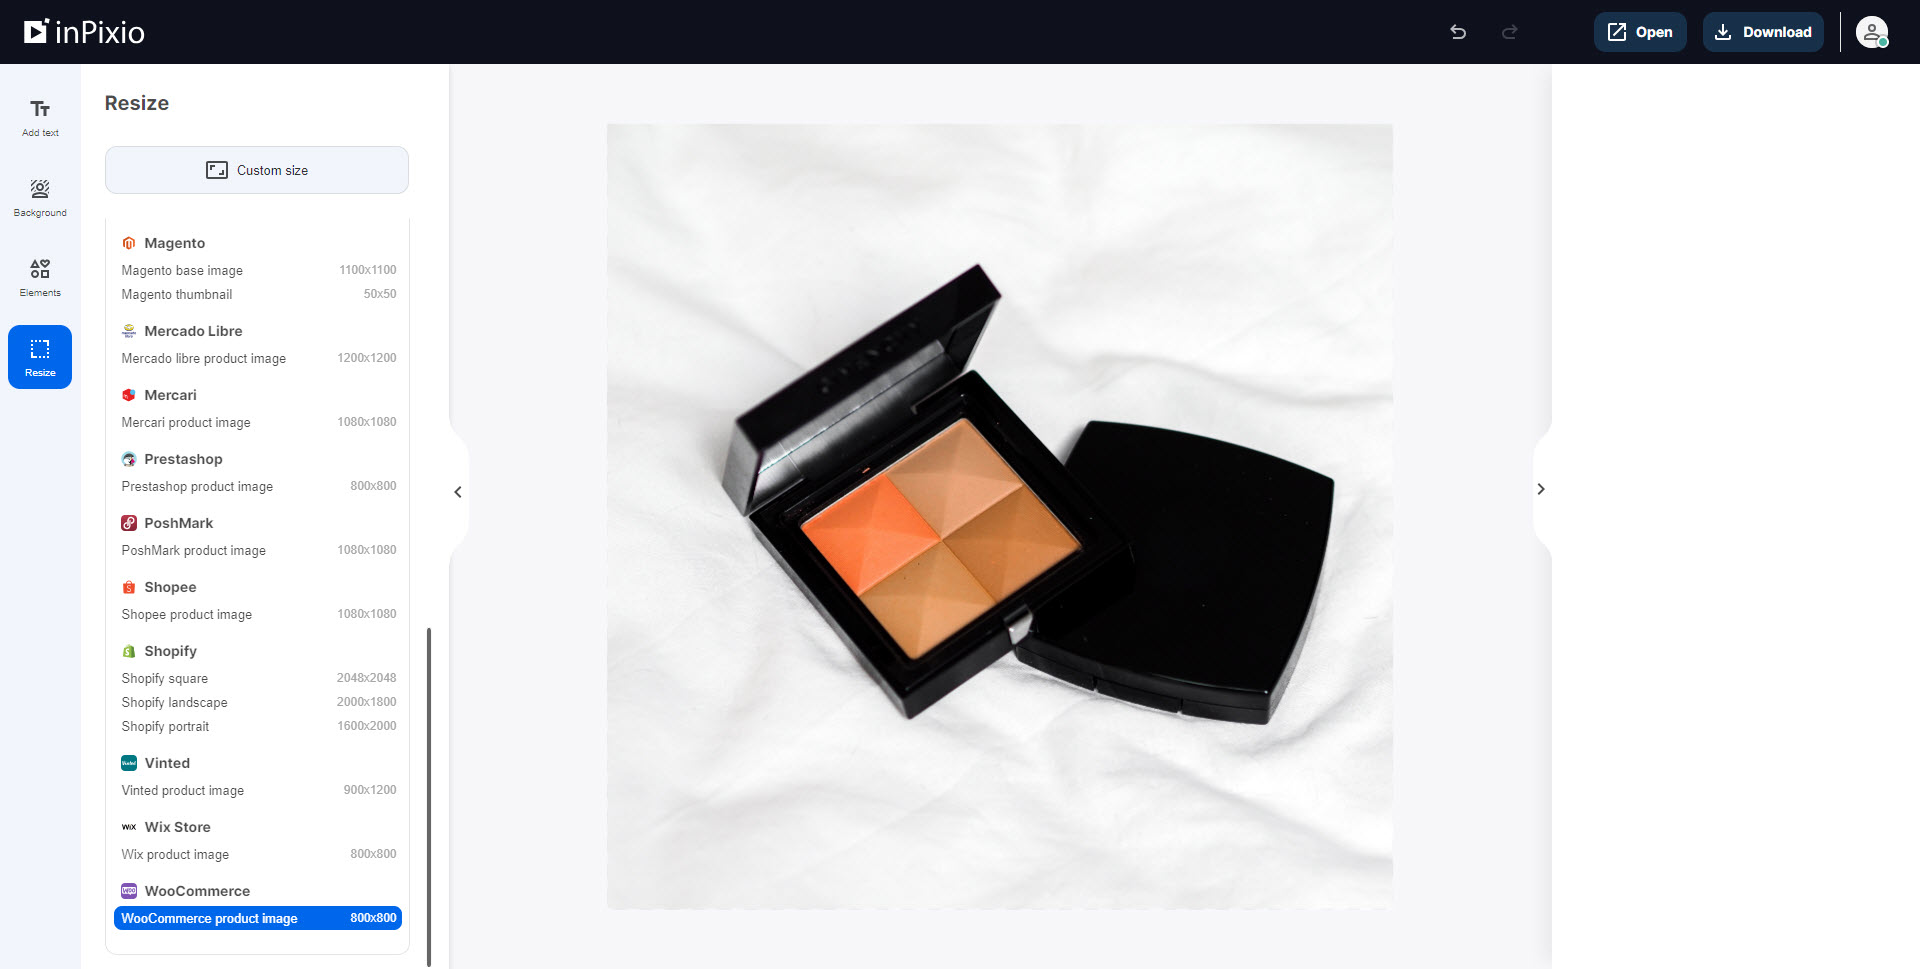
Step 3: Select Resize Option
Choose the “Resize” tool in the left-hand editing panel.
Step 4: Resize Image
Select “Social Media” or “Marketplace” and choose from the size presets. Click on a preset to automatically resize the frame to this size. You can then adjust your image to fit, or add a new background to fill the frame. To set custom dimensions, click “custom size” and enter the desired width or height for your image in pixels. You can lock the image resizer to keep the original aspect ratio of your image.
Step 5: Review and Download
Preview your edited image and ensure it looks the way you want. Once satisfied, click the “Download” button to save your image file to your device.
Tips for Successful Image Resizing
Resizing images is more than just changing dimensions. Here are some tips to help you get the best results with the image resizer:
- Maintain Aspect Ratio: When you resize an image, it’s essential to preserve its original aspect ratio. This means that if you change the width, the height should automatically adjust proportionally, preventing distortion and awkward stretching of the image.
- Don’t Increase Image Size: As a general rule, an image resizer works best for making your image smaller rather than larger. In the same way that changing aspect ratio can cause distortion, making an image larger can reduce image quality and make the final image look blurry or pixelated. If you need to enlarge an image, try using specialist upscaling software such as inPixio’s Photo Maximizer.
- Balance Image Quality and File Size: The image format you choose can affect both image quality and file size. For web use, JPEG is often the best choice, offering a good balance between quality and file size. However, for printing or situations where quality is paramount, consider lossless formats like PNG or TIFF.
- Save Originals: Before you embark on the resizing process, make a copy of the original image. This ensures that you always have access to the highest quality version, and any mistakes during resizing won’t affect your original asset.
Recommended Image Sizes for Popular Platforms
Different online platforms have specific image size requirements. It’s a good idea to resize images to match these requirements as it ensures they looks their best and display correctly in the feed. Here are some common examples of image sizes for popular platforms:
Social Media:
Facebook:
- Cover photo: 851 x 315 pixels.
- Post image: 1200 x 630 pixels.
Instagram:
- Square post: 1080 x 1080 pixels.
- Story image: 1080 x 1920 pixels.
X (Twitter):
- Header photo: 1500 x 500 pixels.
- Profile photo: 400 x 400 pixels.
YouTube:
- Thumbnail: 1280×720
- Intro: 1920 x 1080
- Cover image: 2048 x 1152 (minimum)
Websites:
WordPress Blog Featured Image:
- Largest: 1920 x 1080 pixels.
- For sharing to Facebook: 1200 x 630 pixels.
- For sharing to X (Twitter): 1024 x 512 pixels.
- Note that sizes depend on the theme used.
E-commerce Product Images:
- Wix, Prestashop, Woocommerce: 800 x 800 pixels.
- Shopify: 2048 x 2048 pixels (recommended), 5000 x 5000 pixels (maximum).
These are just a few examples, and requirements can change over time or depending on your website theme, so it’s essential to check the specific platform’s guidelines for the most up-to-date image size recommendations.
FAQ on How to Resize an Image
Can I resize images without losing quality?
Yes, you can maintain image quality by choosing the right dimensions and format during the resizing process. To maintain maximum quality, make sure to preserve the aspect ratio of your image and don’t try to enlarge the image significantly.
What’s the best image format for web use?
JPEG is the most common format for web images. It offers a good balance between quality and file size.
Do I need any special software for resizing images?
No, you can achieve excellent results using the free image resizer in inPixio’s web app without the need for additional software. However, to have full control over image resolution settings and compression, you may want to invest in more powerful photo editing software, such as inPixio Photo Studio for Windows.
How to Resize an Image in Windows 10?
Resizing an image in Windows 10 is straightforward. Follow these steps:
- Locate the image you want to resize.
- Right-click on the image file.
- Select “Open with” and choose “Paint”.
- Click the “Resize” button in the top toolbar.
- Resize by percentage or select “Pixels” to enter custom dimensions.
- Click “OK” to apply the new size.
How to Resize an Image for Printing?
When resizing an image for printing, it’s crucial to consider both dimensions and resolution (DPI). Here’s how:
- Open your preferred image editing software (e.g., inPixio’s Photo Studio for Windows).
- Load the image you want to resize.
- Set the dimensions to match your desired print size (e.g., 8×10 inches).
- Adjust the image resolution to 300 DPI or higher for high-quality prints.
- Save the image in a suitable format like TIFF or PNG for printing.
How to Resize an Image on Mac?
If you’re using a Mac, you can resize images using the built-in Preview app:
- Open the image in Preview (double-click on the image).
- Click the “Show Markup” icon and select “Adjust Size.”
- Enter the desired dimensions in the dialog box. You can also choose the unit (pixels, inches, etc.).
- Preview will automatically adjust the image resolution.
- Click “OK” to apply the changes and save the resized image.
How to Resize an Image on a Phone?
Resizing images on a phone is convenient, thanks to various apps. Here’s a general approach:
- Install an image resizing app, such as inPixio Photo Studio AI for iOS.
- Open the app and select the image you want to resize.
- Choose the desired dimensions or percentage scale.
- Save the resized image to your phone’s gallery or cloud storage.
Each app may have a slightly different interface, but the process is generally user-friendly.
How to Resize an Image Without Losing Quality?
To resize images without losing quality, follow these guidelines:
- Use a high-quality source image to start with.
- Save a copy of the original image before resizing to preserve the original quality.
- Choose the right aspect ratio (width and height) and resolution for the specific use (web, print, social media, etc.).
- Use lossless image formats like PNG or TIFF if possible.
- Avoid excessive compression when saving the final image.
- For the best results, consider using professional image editing software like Adobe Photoshop or inPixio Photo Studio, which offer advanced resizing options while maintaining quality.
By following these steps, you can resize images while minimizing quality loss, ensuring that your visuals remain sharp and clear.
Resizing Images is Easier than you Think
Resizing images is an essential skill for small business owners, entrepreneurs, and content creators. It enhances your content’s visual appeal, file size, loading speed, and mobile responsiveness. With inPixio’s web app, you have several ways to resize that make the process simple and efficient. You can quickly resize images using size presets or opt for a custom size with exact dimensions that maintains the aspect ratio of your original file. Start resizing your images today to take your content to the next level. Whether it’s for websites, social media, or printing, you’re now equipped with the knowledge to resize your images effectively. Happy resizing!


Mastering Image Resizing: A Step-by-Step Guide on How to Resize an Image
How to Remove the Background from a Picture with inPixio: A Step-by-Step Guide

What are WebP files and how do you convert them?

5 Social Media Photo Tips for Busy Small Business Owners