Create Your Own DIY Pro-Quality Newborn Photo Shoot
 The newborn phase is a magical time in your child’s development, and it passes almost as quickly as it begins. It’s no wonder then, that so many parents commission photo sessions as soon as possible after their babies are born. Some moms and dads work with professional photographers in the hospital, whereas others take their tiny humans to studios or invite photographers into their homes. Still others decide to forgo professional photos altogether—and for a variety of reasons.
The biggest reason parents go without professional photography sessions for their tots is undoubtedly cost. Many moms and dads simply can’t justify the expense of a professional newborn photo shoot, or don’t have the time to cart their babies to picture-taking sessions. Still, the allure of that perfect professional-quality photo remains—and that’s where InPixio Photo Editor comes in. With the help of a camera, a little ingenuity and a dash of intuitive computer wizardry, you can create stellar newborn photos at home.
What’s in a Professional Photo?
Why are pro photos so magical anyway? Is an expensive DSLR body, a set of gigantic lenses and a lot of fancy accessories necessary? Actually, no. You can capture beautiful shots of your newborn at home with a clever set of low-tech tricks and a reasonably decent camera. You will need:
- A large piece of fabric for your background
- A cute outfit for baby
- Receiving blankets to prop baby up
- Nursing pillow (optional)
- Three lamps
- A sofa or large chair
- Several cushions
- Lullabies to make the mood
That’s all you’ll need. Well, and a little peace and quiet.
Your Photo Session
First, set up your photography area by draping your blanket over the sofa or chair you intend to use as a makeshift studio. If you have a nursing pillow, you can place it under the fabric to create a place for your baby to lie. Plug in your lamps and place them to the left, right and directly in front of your mini studio.
For best results, coddle your newborn thoroughly before you begin. The phrase, “Never work with animals or children” need not apply as long as you feed, cuddle and pamper your wee bairn before taking pictures. Once your tiny person has settled down, put them gently down in your previously prepared studio setting. If the lamps seem too bright, move them further back. You can also switch one or more lamps off to play with shadow.
Take as much time as you need, and remember that newborns don’t always cooperate with professional photographers, so don’t be hard on yourself. Roll the receiving blankets and use them to prop up various parts of your child’s body to help baby strike a pose. Satisfied with the pictures you’ve taken? Great: time for some technological magic.
Using InPixio Photo Editor
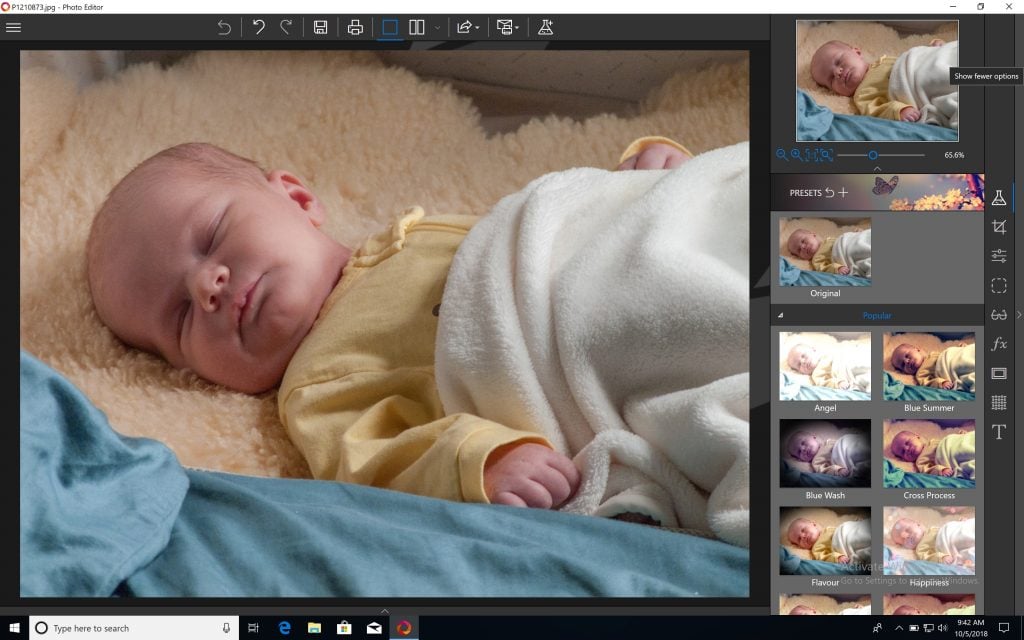
One of the best things about InPixio Photo Editor is its intuitiveness. It’s an ideal program for beginners and also for more advanced photographers who want to achieve a certain look in seconds. You can rotate and crop slightly skewed photos, apply various filters and frames, and adjust levels manually to your heart’s content.
Here’s our original photo:
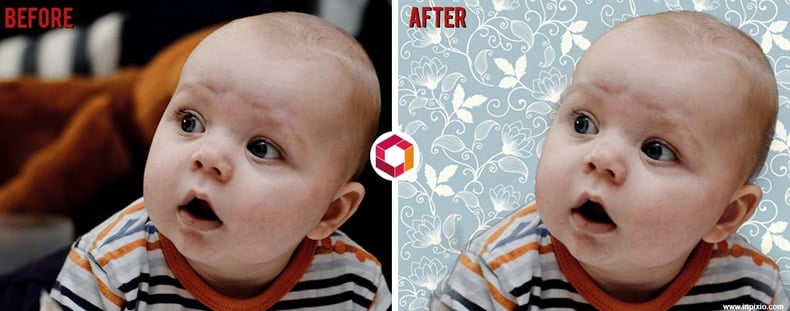
(InPixio Photo Eraser, sold separately, can help you nix small stains on clothing, newborn acne and other unwanted artifacts before you begin.)
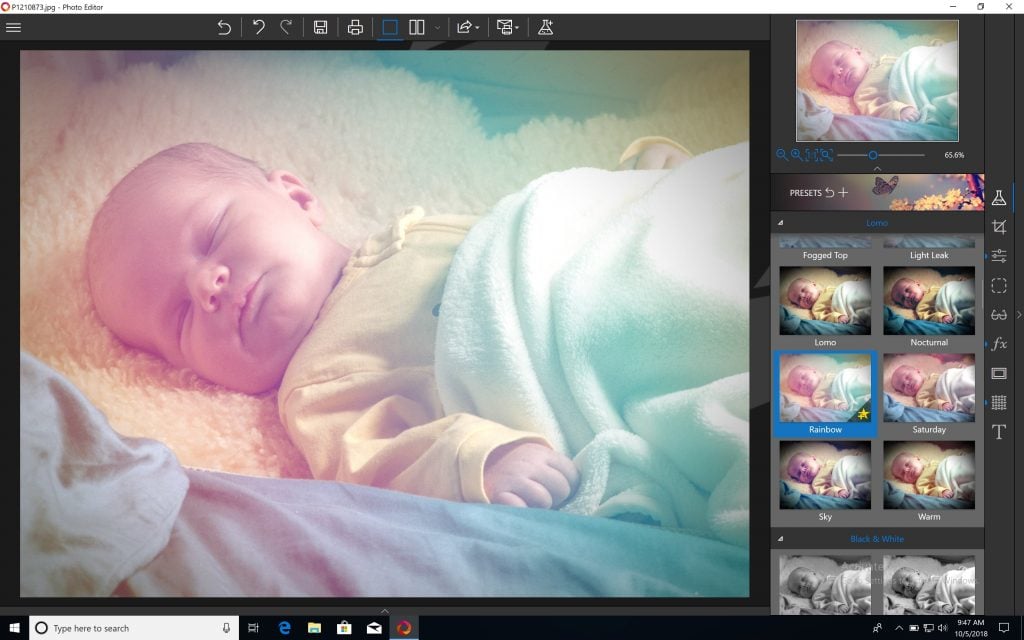
If you’re into instant gratification, check out the gorgeous range of presets in InPixio’s primary menu on the right-hand-side of the screen. Here’s the Rainbow preset in action:
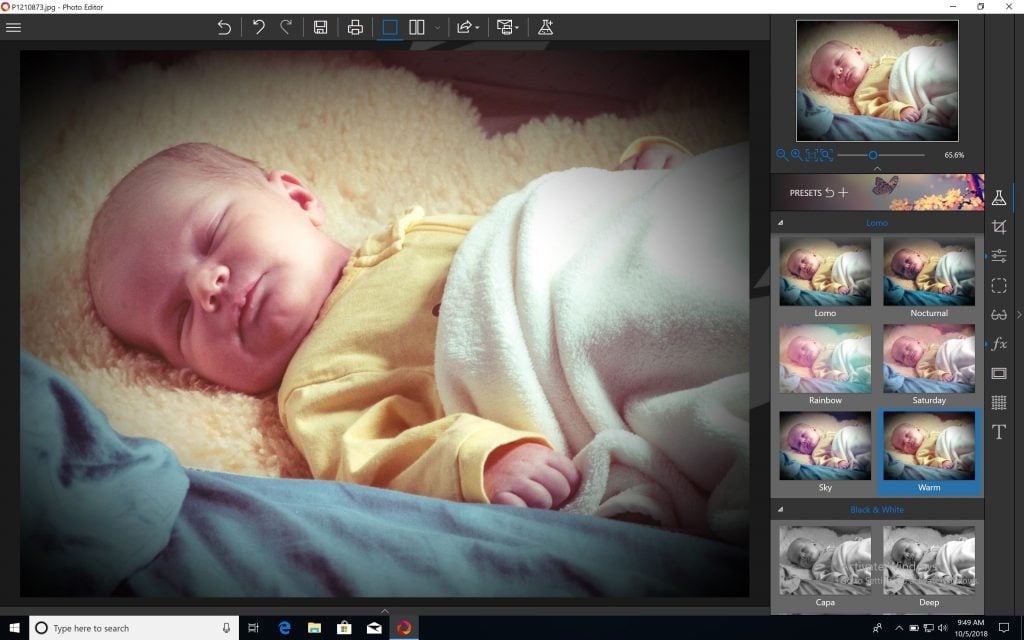
 Here’s the Warm preset in all its glory:
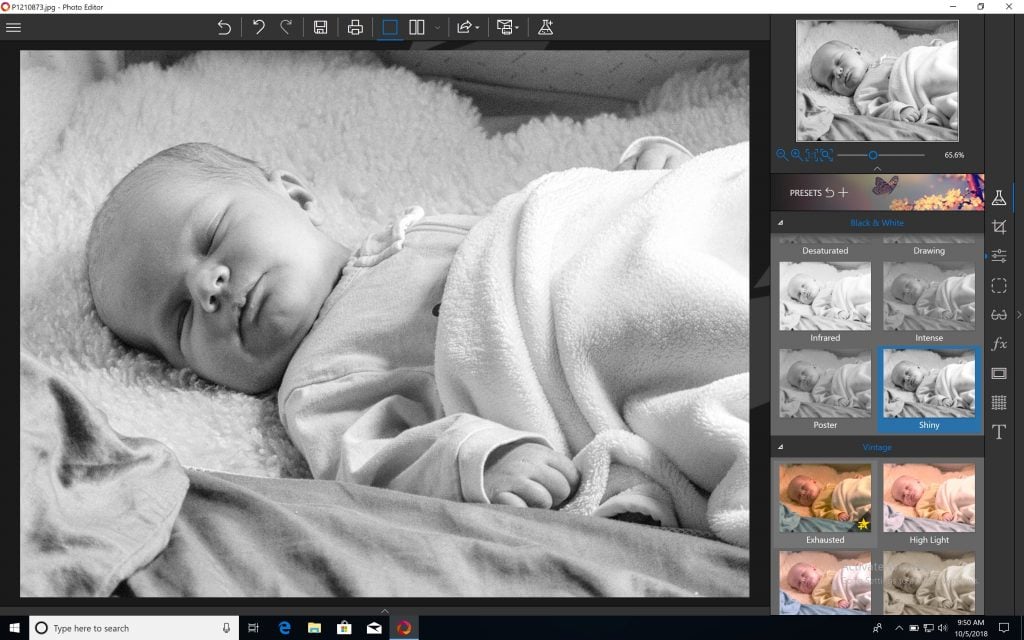
 For good measure, here’s a beautiful black-and-white preset, known as Shiny:
 Finally, here’s a preset called Exhausted, which seems both visually and nominally appropriate for a newborn photo:
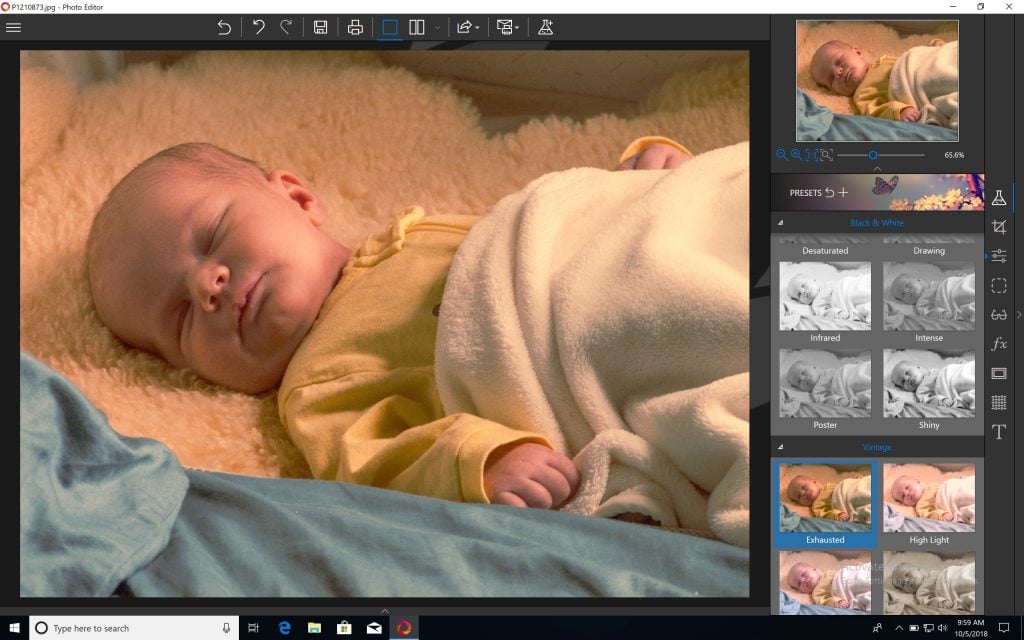 Generally speaking, photographers use soft presets to bring out the beauty of the newborn photographs they take. You’ll want to avoid harsher presets if you want to preserve your baby’s delicate features.
Clever InPixio Tricks
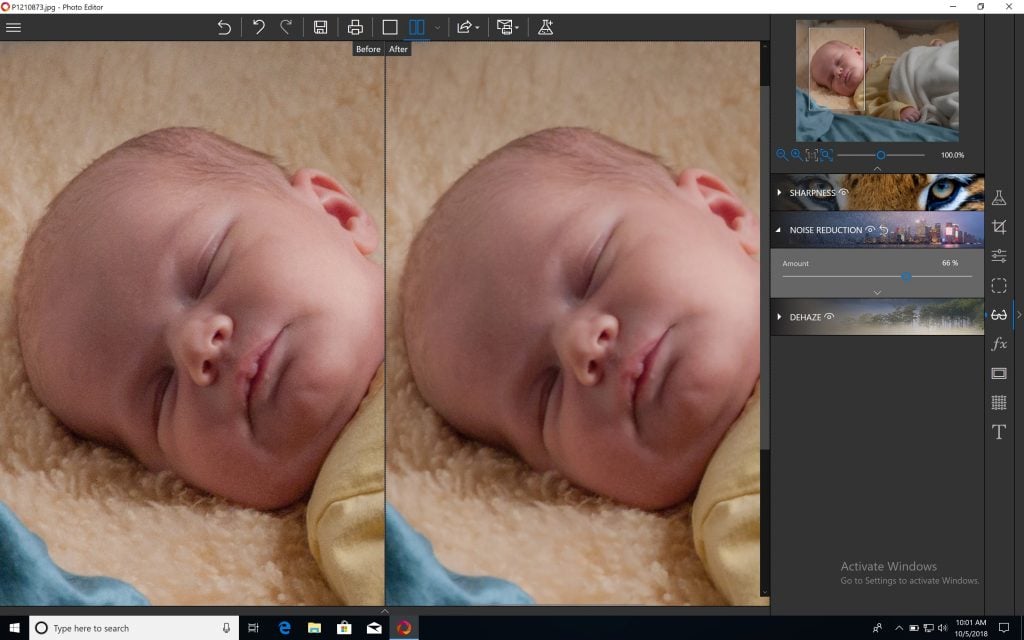
Babies like low light; unfortunately, cameras don’t. Without the help of a very large lens and an enormous aperture setting, photos taken in low light tend to contain noise. Noise is annoying at the very least, but if it’s really bad, it can flat-out ruin a great shot. To get rid of noise, go to the Correction menu on the right of the InPixio Photo Editor interface and move the slide to the right to increase the noise-reduction intensity. You can compare before and after by switching on the before/after view at the top of the interface.
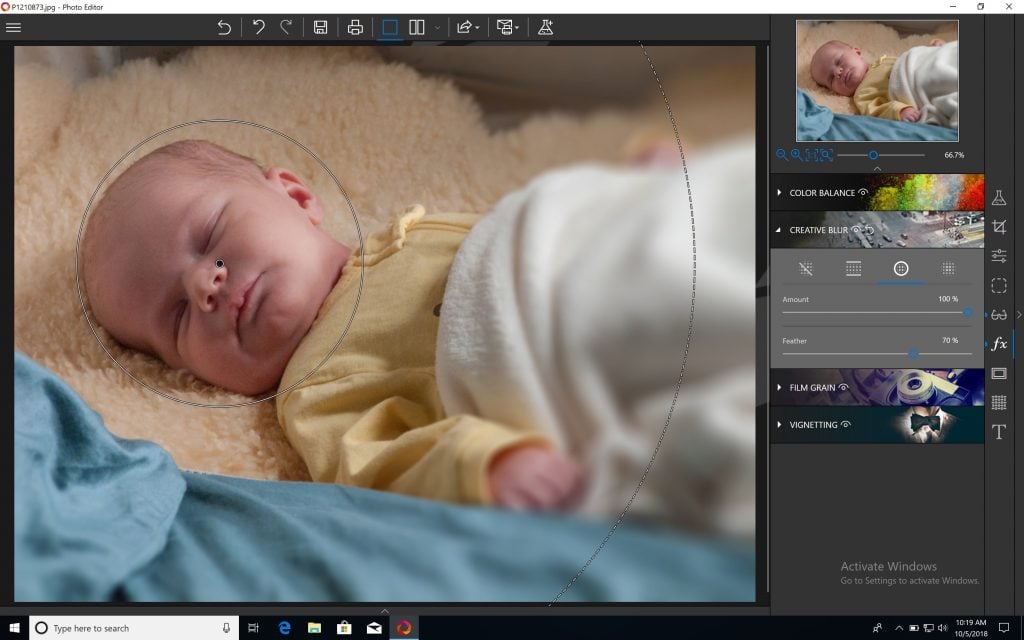
 To get an attractive background blur and emulate what professional photographers call “bokeh,” visit the Effects menu. You can choose from Linear Blur, Radial Blur and, if you’re feeling adventurous, Custom Blur. Here, we’ve chosen Radial Blur and we’ve moved the center of the blur over our baby subject’s face, adjusting the feather size, the total blur size and the blur amount.
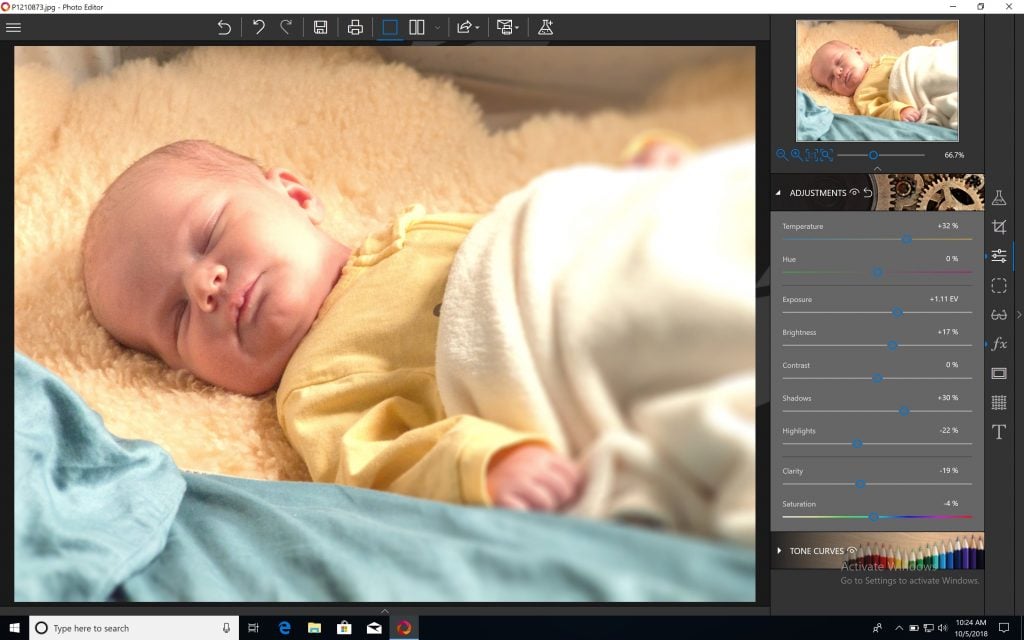
 To take full control over your photo, go to the Adjustments panel. Here, we’ve eliminated a certain amount of shadow, enhanced highlights, taken the exposure and brightness up several steps, decreased the clarity of the image and, finally, decreased the saturation and increased the temperature of the image overall. The result is a very warm, very soft and very professional-looking newborn photo.
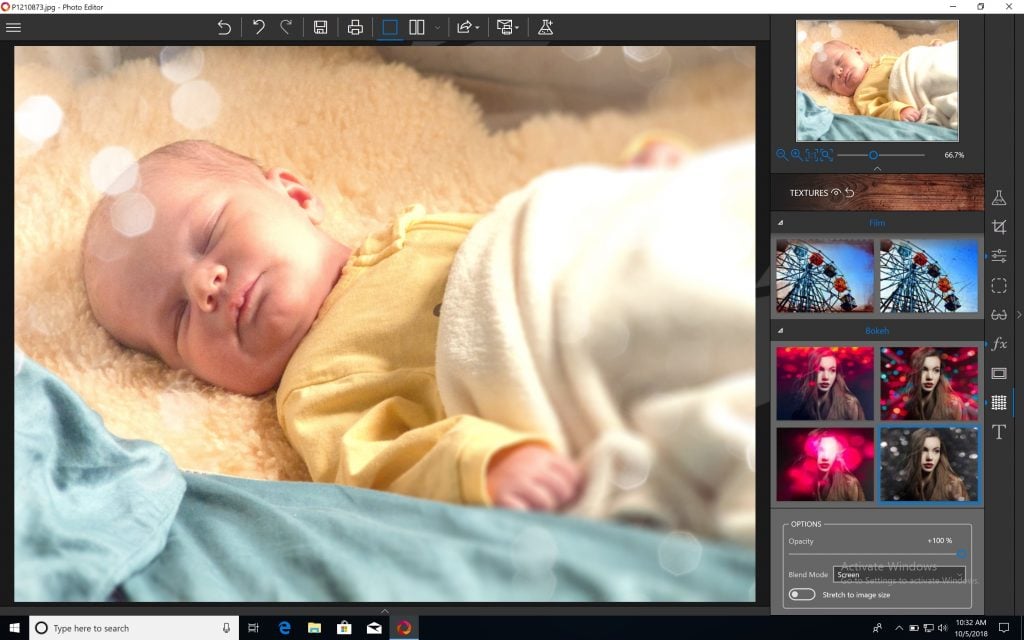
 InPixio Photo Editor’s Textures panel can help you put a truly gorgeous final touch on your photograph. Here we’ve applied a Bokeh texture, which adds a beautiful cascade of shimmering light around our tiny model.
 For a vintage effect, try one of the Film textures and fiddle with the opacity and the blend mode until you’re satisfied, like this:
To apply a vignette, simply go back to the Effects menu. Move the slider to the left for a darker vignette, and to the right for a paler vignette, like so:
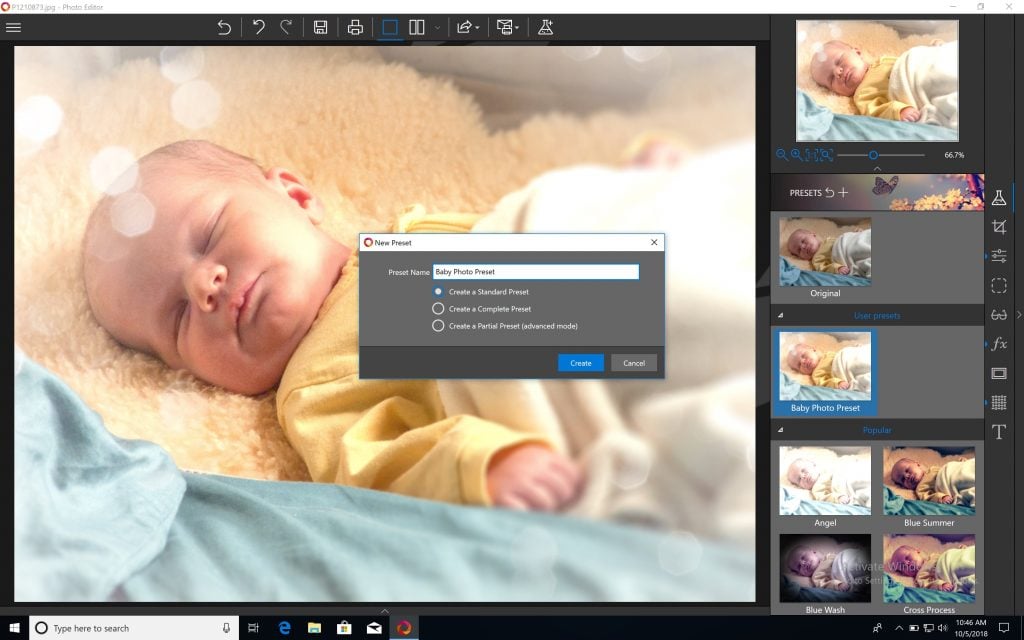 Above all, have fun and use the back button at the top of the screen if you need to undo mistakes. Enjoy InPixio Photo Editor’s versatility—and if you really like what you’ve done with a particular photo, create a preset you can apply to other baby photos by clicking on the lab flask icon at the top of the interface.
 You’ve just welcomed the newest member of your family: capturing those first few days in your child’s life is an absolute must. With a handy camera, a few easy-to-find props and InPixio Photo Editor, you can create a gorgeous newborn photo shoot all by yourself, no pro needed.


Mastering Image Resizing: A Step-by-Step Guide on How to Resize an Image
How to Remove the Background from a Picture with inPixio: A Step-by-Step Guide

What are WebP files and how do you convert them?

5 Social Media Photo Tips for Busy Small Business Owners