How to create clean product shots
Creating clean, professional-looking product shots is a great way to make your products shine on eCommerce platforms and increase your conversions. And it’s not as difficult as you might think. In this post, we look at some of the easiest tips for improving your product photography. We also show you how you can cheat your way to perfect shots with the help of a background eraser.
 Why do I need a clean product shot?
Whatever your product, if you are selling online, you need professional images to entice your customers to buy. Online customers cannot view your product in “real life” so they have to rely on the images you provide to judge its quality and value.
This is even more important when selling via online platforms such as Amazon, Ebay or local classified websites, where buyer trust can be an issue. On these sites, presenting your products with clean and clear images can reassure your potential customers and have a positive impact on your conversions.
To put this in numbers, research by the Etsy platform found that 90% of shoppers rated product photos as “very important” or “extremely important” to their purchase decisions. This is higher than the percentages for product price, shipping costs and reviews, making product images the single most important factor in customer purchase decisions.
So presentation really is everything, and appearances really do count towards conversions. The good news is that creating professional product shots is not as difficult as you might think. What’s more, all is not lost for your existing shots: we’ll show you how doing a simple photo cutout with a background eraser can save you from reshooting all your products.
What makes a great product shot?
There are endless possibilities to get creative with your product shots, from studio setups and close-ups, to scale and lifestyle shots. If you are looking for inspiration, we have included some great sites at the end of this post. Depending on the platform you are using, you may be able to upload several different images to give the best all round impression of your product.
Whatever your product and your platform, however, you are definitely going to need at least one simple image of each item to show your customers what they are buying. This image should display your product clearly on a white or neutral background with good lighting.
You could of course hire a professional photographer to take your shots for you. But with a few tips and some help from a background remover, you can save cash by doing your own photography. Here are a few basics for capturing a great shot.
1.) Camera and equipment
Take high-resolution photos where possible. Ebay recommends using the medium or high file size setting on your camera. The files might be a bit on the heavy side but high-resolution images enable customers to make use of the zoom and enlarge capabilities offered by sites such as Ebay.
If you are using a smartphone camera, avoid zooming in on your product when photographing, as this can reduce image quality. It is also best to refrain from using filters etc. at the photography stage, as this can make your photos more difficult to edit later.
Useful extras: Tripod, wireless remote, smartphone lens
2.) Lighting
You can use natural or artificial light for your photos, but avoid mixing both types.
If using natural light, ensure that it is even and not too dark or too bright. For best results, shoot your products near a window on a slightly cloudy day.
If using artificial light, bear in mind that your standard overhead light is unlikely to be sufficient by itself. You will need to light your item from the sides and from above.
When shooting indoors, avoid using the flash on your camera. Using the flash can result in an unnatural looking image with uneven light.
Useful extras: bounce cards (or reflectors), diffuser, box lights, light box
3.) The Setup
Shoot as many products as possible in one session with the same set-up and lighting, this is the easiest way to ensure consistency across your photos.
Crucial to your set-up will be your background. As mentioned earlier, a white or neutral background is best for focusing in attention on your product. You can get a simple white background by spreading a sheet of craft paper underneath and behind your item to make a sweep. As we will see later, having a white or monotone background also makes it easier to remove the background by doing a photo cutout with a background eraser.
Ensure your product is nicely cleaned and polished up before the shoot. It would be a shame to ruin a perfect shot with a dirty smudge, so make sure that your product is ready for its close up! The same applies to your camera: give the lens a good clean before you begin. These steps can save valuable time retouching you photos later.
Last but not least, regularly check your photos on a big screen and make adjustments to your setup. This means uploading your photos onto a computer so you can get a better look at them. While this might seem a bit time-consuming, it can actually save time overall by highlighting any problem areas early in the shoot. This is especially true if you are shooting multiple products.
Useful extras: white paper, clips, chair or table, tripod
4.) The Platform
Remember that eCommerce platforms often have their own recommendations and guidelines for product shots so it is a good idea to check these before you start. For example, Ebay specifies a minimum photo length of 500 pixels for the longest side of the picture.
How can I clean up existing product photos?
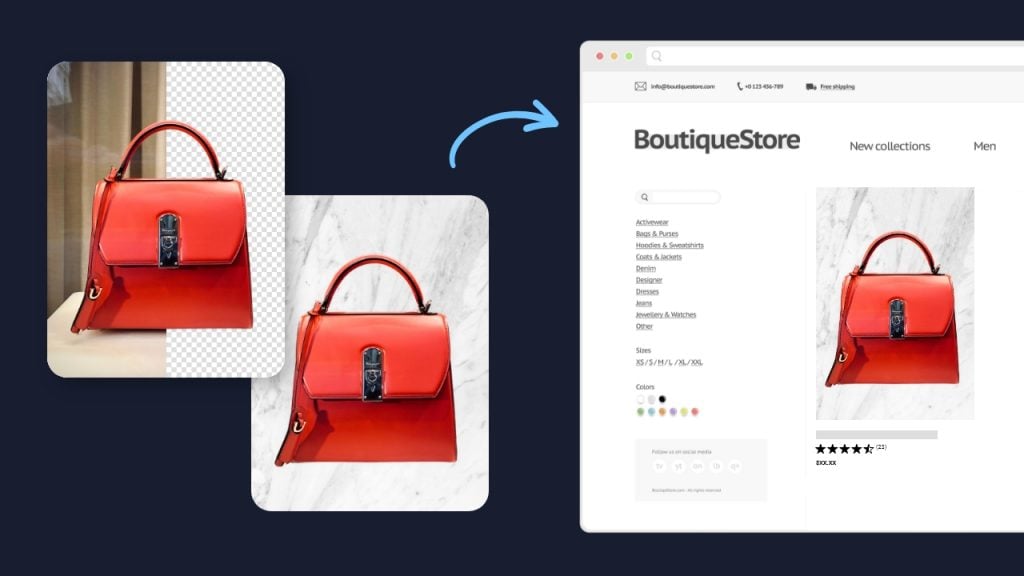
So now you know a bit more about how to take the perfect product shot. But what about your existing photos? Do you need to reshoot everything just because there’s a bit of color in the background? You will be pleased to learn that the answer to this question is no, and the reason is that you can easily smarten up your existing images with the help of a background remover.
Changing the background of your photos can make a world of difference to how professional they look and it is nowhere near as difficult as you might think. There are free tools available that are easy to use but still generate flawless photo cutouts. Removing your photo backgrounds will get rid of noise in your shots and make your images more consistent. This will allow your customers to focus entirely on your great product. It will also put you in control of your images with the ability to design montages or other creations.
What is a background remover and how does it work?
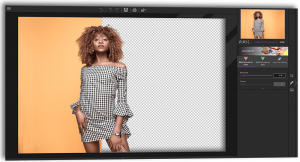 A background remover (or background eraser) is a photo-editing tool that uses an algorithm to detect the foreground and background of your image. Once detected, the algorithm deletes the original background while preserving a cutout of the photo’s subject, in this case your product, in front of a new transparent background.
There are two main types of background remover. The first is an automatic tool that attempts to do all the work for you. You upload your image and the algorithm automatically detects and removes the background. While this might sound ideal, the disadvantage of this type of tool is that it can lack accuracy. Also, if you don’t get the result you want first time then there’s not much you can do to adjust things.
With the second type of background remover, the user selects the background and foreground by marking these areas roughly on the image. The algorithm does the rest. This kind of background eraser is simple to use and will usually generate more precise results than a 100% automatic tool. What’s more, if you’re not happy with your picture after removing the background, you can easily make adjustments or start over again. A great example of this kind of background eraser is the free Remove Background tool by InPixio
What kind of photos work best with a background remover tool?
You can use a background eraser such as Remove Background on almost any kind of picture, from holiday photos to company logos. Background erasers work particularly well with photos containing people or solid objects. This makes them an ideal tool for your product shots.
To ensure you get a perfect photo cutout first time, it is best to use an image which has a distinct contrast between the foreground and background. Clear contrasts make it easier for the algorithm to detect the different areas of the image. This explains why it’s a good idea to photograph your products against a solid background, such as a sheet of paper, even if you intend to remove this background later.
If you don’t have a perfectly solid background, don’t worry, you can still use a background eraser to cut out your product image. Just take care to mark all the background and foreground areas clearly on your image. We’ll show you how in the next part of this post.
How can I use a background remover for my product photos?
Background removers are very simple to use. With InPixio’s Remove Background tool, there are six basic steps to a perfect photo cutout:
1.) Upload your product shot
You can upload a photo from your computer or smartphone, or simply drag and drop an image file.
2.) Adjust settings if desired
Default settings are provided, but you can use the scalers to enlarge your image if needed. This can make selecting foreground and background areas even easier. The same goes for brush sizes, you can adjust the size and feathering settings if desired.
3.) Highlight the areas you want to remove
Select the red “Remove” tool and mark all the background areas of your image using the brush provided. There is no need to fill in areas completely, a few strokes of the brush will do.
4.) Highlight the areas you want to keep
Select the green “Keep” tool and just as you did for the background, mark the parts of the image you want to preserve in green (in this case your product). Once again, a few markings on top of your product are sufficient to get an accurate photo cutout. Avoid circling or “lassoing” your subject as this can confuse the algorithm.
5.) Let Remove Background work its magic!
Once you’ve marked your background and foreground areas, hit “apply” and Remove Background will get to work erasing your background. Once finished you will see a preview of your modified image. This will contain a photo cutout of your product over a new transparent background.
6.) Make adjustments and download your new image
If you’re happy with the result you can download and save your image and move straight onto your next product shot. At this stage you can also adjust your remove and keep markings and run the background eraser again. If desired, you can entirely revert changes and try again from scratch.
And it’s as simple as that! Once you’ve got your background-less product shot, the possibilities are endless. Paste your photo cutout onto a clean monotone background to make the perfect, professional studio shot for your local classifieds website. Or get creative by adding an exciting new background or creating a montage that will wow your potential customers.
You can find out more about InPixio’s free Remove Background tool here.
Ready to get creative with your product shots? Then you should also check out the InPixio Free Photo Editor tool. With this photo-editing tool, you can make use of filters, textures and other effects to further improve the lighting and color of your images. You can also add text directly to your images and frame your photos. Perfect for getting started with more sophisticated product shots.
Wishing you all the best with your product photography!
Get inspired: websites using great product photography
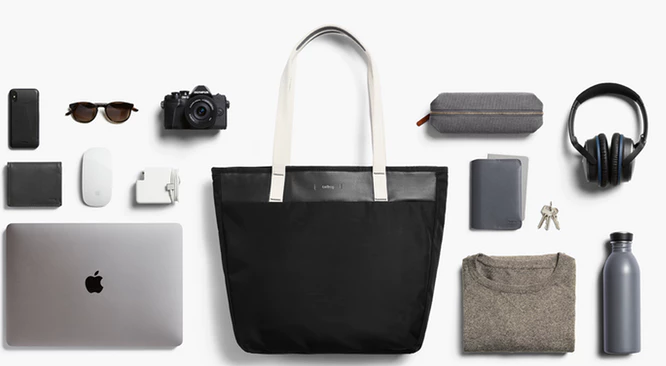
1.) Bellroy
Bellroy sell bags and wallets. Their product shots are great because they show their products inside and out from every possible angle. They also give an idea of the size of items such as bags by demonstrating what kind of things would fit inside. All of this means that a potential customer can get an accurate impression of what the product would be like to use. Bellroy also offer some striking lifestyle shots of people carrying their products. These shots use contrasting background and foreground colors that draw the focus to the items.
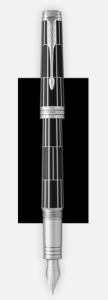
2.) Parker
Pen-manufacturer Parker opts for a unique leather textured background for its images, creating a luxury feel for its products. This is a great example of how you can play with background colors and textures to generate a unique atmosphere that will appeal to your customer base. Parker also has some nice, detailed close-up shots of its pens.
3.) Apple
The Apple website presents modern, minimalist product shots, which nonetheless have high impact. They play with colors and angles to create product images that look both simple and artistic. For example, with the iPhone, Apple takes advantage of the wide color range of this product line to create a rainbow montage. Adopting an offset, vertical arrangement for this montage gives the image added edge and originality. Shooting similar products together in a complimentary arrangement can be a great way to show them off. Simple photo editing software can also help you to achieve the perfect montage.
4.) Kusmi Tea
If you didn’t fancy a nice cup of tea already, you will do after visiting the Kusmi Tea website. Each tea type has a dedicated page providing multiple simple product shots. These include an actual close-up of the tealeaves, as well as clear images of the different packages available. What is most impressive about the Kusmi website, however, is its lifestyle shots. These complement the product packaging by placing it in a relatable context, for example on top of a tray with some cookies. This kind of cozy look would be easy to recreate in a home photo shoot, with perhaps some warm filters added later.


Mastering Image Resizing: A Step-by-Step Guide on How to Resize an Image
How to Remove the Background from a Picture with inPixio: A Step-by-Step Guide

What are WebP files and how do you convert them?

5 Social Media Photo Tips for Busy Small Business Owners